
3D Nodes
3D nodes bring a new dimension to your creative workflows. They use AI to transform photos, sketches, or text descriptions into fully-textured 3D models ready for games, e-commerce, and 3D printing.
What Are 3D Nodes?
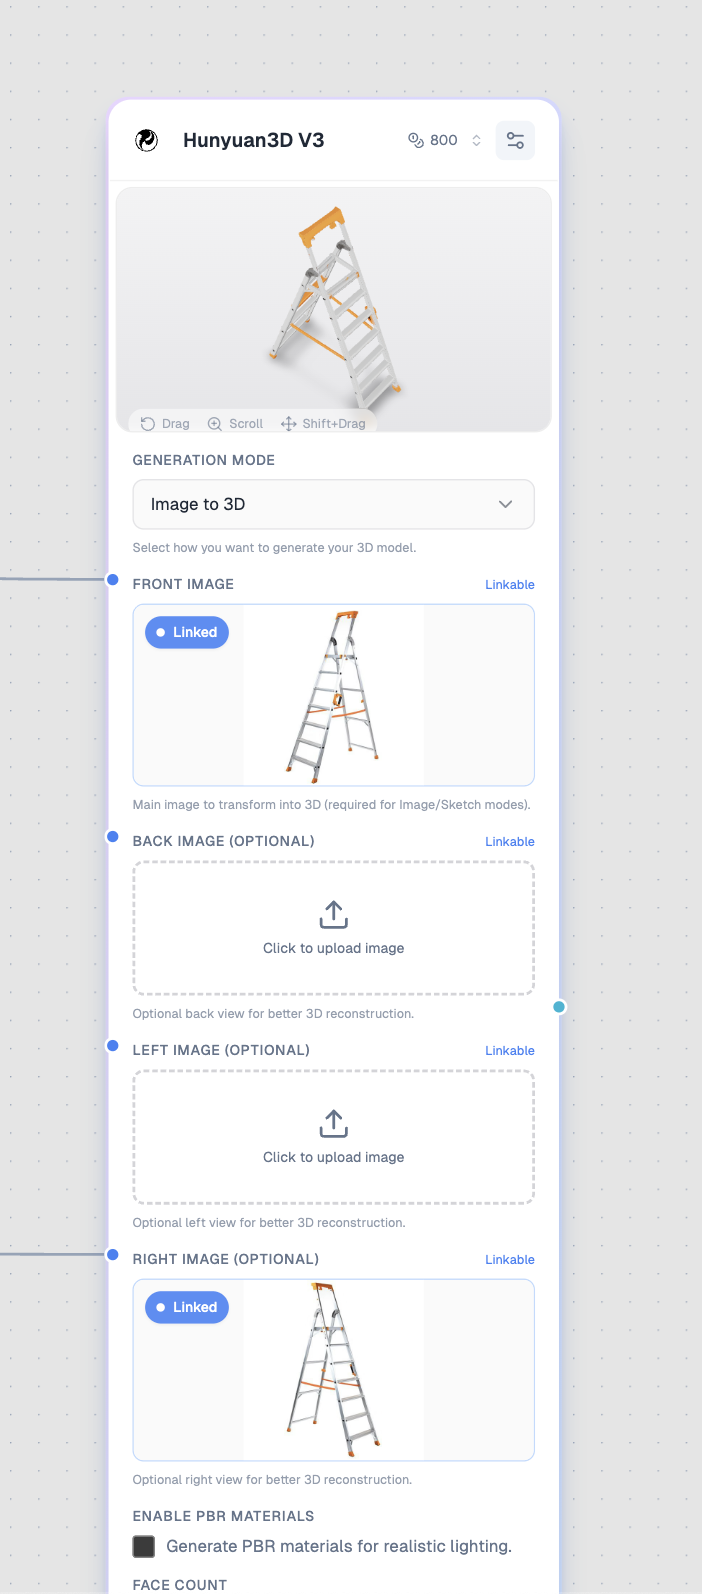
A 3D node with the Hunyuan3D V3 model showing an image-to-3D workflow.
3D nodes generate 3D models using AI. They can:
- 🖼️ Image to 3D — Convert photos into 3D models
- ✏️ Sketch to 3D — Transform line art into textured models
- 💬 Text to 3D — Generate 3D models from text descriptions
- 🎮 Interactive preview — View and manipulate 3D models directly in the canvas
Adding a 3D Node
- Open the node sidebar on the left
- Find 3D in the list
- Drag it onto your canvas
3D Node Inputs
3D nodes accept different inputs depending on the generation mode:
| Input | Type | Required | Purpose |
|---|---|---|---|
| Front Image | Image (blue) | Image/Sketch modes | Main image to transform |
| Back Image | Image (blue) | No | Optional back view for better reconstruction |
| Left Image | Image (blue) | No | Optional left view for better reconstruction |
| Right Image | Image (blue) | No | Optional right view for better reconstruction |
| Prompt | Text (yellow) | Text/Sketch modes | Describes the 3D model |
Generation Modes
Image to 3D
Transform photos into 3D models:
[Upload Node] → [3D Node (Image to 3D)]
Your photo → Interactive 3D model
Best for:
- Product photography
- Object scanning
- E-commerce 3D views
- Game asset creation
Pro tip: Provide multiple views (front, back, left, right) for better 3D reconstruction accuracy.
Sketch to 3D
Convert line art or sketches into textured 3D models:
[Upload Node] → [3D Node (Sketch to 3D)]
Your sketch → Textured 3D model
Best for:
- Concept art to 3D
- Character design prototyping
- Quick 3D mockups from drawings
Note: Sketch mode requires a prompt to describe colors and materials since sketches are typically black and white.
Text to 3D
Generate 3D models directly from text descriptions:
[Text Node] → [3D Node (Text to 3D)]
Your description → Generated 3D model
Best for:
- Quick 3D concept generation
- Prototyping objects
- Creating 3D assets from ideas
3D Node Settings
Model Selection
| Model | Credits | Best For |
|---|---|---|
| Hunyuan3D V3 | 800 | High-quality 3D with PBR textures |
Generation Mode
Choose how you want to generate your 3D model:
| Mode | Input Required | Description |
|---|---|---|
| Image to 3D | Front image | Best quality, supports multiple views |
| Sketch to 3D | Front image + Prompt | Line art to textured 3D |
| Text to 3D | Prompt only | Generate from text description |
Enable PBR Materials
Toggle to generate Physically Based Rendering materials:
- Off — Standard textures
- On — PBR materials for realistic lighting in 3D engines
When to use: Enable for game engines (Unity, Unreal) or professional 3D software.
Face Count
Control the polygon complexity:
| Range | Use Case |
|---|---|
| 40,000 - 200,000 | Mobile games, web 3D |
| 200,000 - 500,000 | Standard quality |
| 500,000 - 1,500,000 | High detail, close-ups |
Default: 500,000 (balanced quality and performance)
Generation Type
Choose the output style:
| Type | Description |
|---|---|
| Normal | Fully textured model (default) |
| LowPoly | Reduced polygons for games |
| Geometry | White model without texture |
Viewing 3D Models
When generation completes:
- Interactive preview appears in the node
- Drag to rotate the model
- Scroll to zoom in/out
- Shift+Drag to pan
- Fullscreen button to view larger
- Download button to save as GLB file
Controls
| Action | Control |
|---|---|
| Rotate | Click and drag |
| Zoom | Scroll wheel |
| Pan | Shift + drag |
| Reset | Double-click |
Output Format
3D nodes output models in GLB format:
- Industry-standard format
- Includes geometry, textures, and materials
- Compatible with:
- Unity
- Unreal Engine
- Blender
- Three.js
- Most 3D software
Multi-View Image-to-3D
For best results with Image-to-3D, provide multiple views:
[Upload Node (Front)] ─┬→ [3D Node]
[Upload Node (Back)]  ─┤
[Upload Node (Left)]  ─┤
[Upload Node (Right)] ─┘
Tips for Multi-View
- Use consistent lighting across all views
- Keep the object centered in each image
- Use the same distance/zoom level
- Ensure backgrounds are clean or similar
Workflow Examples
Product 3D Model
- Add Upload Node with product photo
- Add 3D Node with Image-to-3D mode
- Connect Upload → 3D (Front Image)
- Optionally add back/side views
- Enable PBR Materials for realistic rendering
- Run to generate 3D model
- Download GLB for your e-commerce platform
Character from Sketch
- Add Upload Node with character sketch
- Add Text Node with color/material description
- Add 3D Node with Sketch-to-3D mode
- Connect Upload → 3D (Front Image)
- Connect Text → 3D (Prompt)
- Run to generate character model
Quick Concept Object
- Add Text Node with object description
- Add 3D Node with Text-to-3D mode
- Connect Text → 3D (Prompt)
- Run to generate concept model
Tips for Better 3D Models
Image-to-3D Tips
- Use high-resolution, well-lit images
- Avoid extreme angles or occlusions
- Clean backgrounds improve results
- Multiple views dramatically improve accuracy
Sketch-to-3D Tips
- Use clear, clean line art
- Avoid excessive detail in sketches
- Write detailed prompts for colors and materials
- Example prompt: "Orange tabby cat with white paws, fluffy fur texture"
Text-to-3D Tips
- Be specific about shape and proportions
- Mention materials and textures
- Describe the object from multiple perspectives
- Example: "A rustic wooden treasure chest with iron bands, ornate lock, weathered dark oak finish"
Common Issues
Model Looks Flat
- Add side/back view images
- Increase face count
- Use cleaner input images
Textures Look Wrong
- Enable PBR materials for better lighting
- Use higher quality input images
- For sketches, write detailed material prompts
Download Issues
- GLB files are large — wait for full download
- Check browser download settings
- Try downloading in fullscreen gallery view
Use Cases
E-Commerce
Create interactive 3D product views:
- Furniture
- Electronics
- Fashion accessories
- Jewelry
Game Development
Generate game assets quickly:
- Props and objects
- Character concepts
- Environment pieces
- Prototype models
3D Printing
Create printable models:
- Use Geometry mode for solid models
- Higher face counts for detail
- Check model in Blender before printing
AR/VR
Create content for augmented/virtual reality:
- Product visualization
- Virtual showrooms
- Interactive experiences
Next Steps
- Hunyuan3D V3 — Detailed model guide
- Tool Nodes — Process your outputs
- Video Nodes — Animate your content